How to rank in Google Images? Do visuals help with SEO implementation or not really?
Using visuals in web articles is not only a way to attract visitors and present information in another format (diagrams, charts, logos, design samples, etc.) but also an opportunity to SEO-optimize your content even better. Working with images can be related to various technical and non-technical areas. These include resizing and adapting for image mobile application displays, increasing load speed by managing the images’ sizes, structuring visuals and marking their copyright, and using tags to both include keywords that increase search relevance and call for action. And much more.
Image optimization improves Google image search ranking and enhances the website’s organic performance. Images SEO and images SEO best practices are what each search optimization specialist should know and perform to succeed.
Table of Contents
Tip 1. Resize Images
Tip 2. Make Your Image Mobile-Friendly
Tip 3. Test Speed
Tip 4. Optimize Image File Name
Tip 5. Use Alt and Title Tags
Tip 6. Include Caption
Tip 7. Use Unique Images
Tip 8. Structure Your Data
Tip 9. Create an Image Sitemap
Tip 10. Optimize Images for Social Media Sharing
Conclusion
Tip 1. Resize Images
The best approach to dealing with images used in websites is to find a proper balance between small size and high quality. This is the key element of SEO-optimizing visuals.
File size
The image file size is measured in bytes but its resolution is usually measured in pixels, with both display dimensions of height and width being expressed so. The common image resolution used is 600 px to 400 px. The common file image size is 300 kb.
Image format
Each format supports a certain maximum image size and results in a certain resolution-to-size ratio. For example, JPEG/JFIF supports a maximum image size of 65,535×65,535 pixels. So, don’t forget to choose the right format for your images, as the format affects the final file size and so the webpage load, too. Common formats used are PNG, JPEG, WEBP, GIF, and SVG. JPEG is universally recommended. WEBP is recommended by Google. GIF is not recommended, convert to videos instead. SVG format is suitable for logos only.
Compression rate
Lastly, choose the right compression rate which will allow you to keep the quality. There are many online services available to complete this task for you without extra setup required. For example, you can use WordPress plugins such as ImageCompressor by Optimizilla or other online tools recommended by Google such as ImegeMin.
Hint for regular images: Find out the maximum image size for your visuals and don’t ever add files to your website which exceed this size.
Hint for large images: In one of its explanatory resources, Google recommends using at least 1200 px wide images and enabling the max-image-preview for them, with either a large setting or by using AMP.
Tip 2. Make Your Image Mobile-Friendly
Today, a large portion of users prefer visiting websites from their portable devices, which means they may search Google images on mobile. So, it is crucial to adapt images to be opened via smartphones. Often, an image that is clear and quickly loaded from a desktop looks too small and unfocused or unclear from a mobile device. If there is text or small details on such a picture, the user will most definitely miss that information. So, ensure to make the visuals mobile-friendly, too. Minding principles of image optimization in SEO, you may even get into the mobile-first index for your webpage which can’t easily get indexed well as a desktop version because of high rivalry.
You can reach this goal by setting different image sizes for desktop and mobile devices. To do so, switch on Image dimension attributes for each image, for both height and width. These attributes should be necessarily present for PWA and AMP of the webpages.
In addition, you can set up the so-called responsive images by using the srcset and sizes attributes to provide the browser with additional source images, enabling the display of identical image content resized for the device. Srcset is an HTML attribute that simplifies and automates the sizing of the visuals displayed on the website. It is used to create different-size versions of the same image and configure them by storing information about their resolution. Modern browsers then use this configuration to determine which image to use in each particular case.
There are two steps in applying srcset: creating image versions and preparing the markup (see example below). There is no limit to the number of copies you can create, so mind creating not only smaller and bigger versions but also different proportions of the image so that all popular displays are covered and the adapted image will be nicely displayed on those. For some sizes of the images, create different resolutions, minding the highest possible one (follow technology launch news such as Ultra HD, 4K, 5K, etc.). The minimum recommended number of sizes is four. Then, create the markup where you will list all image file names you created and their size descriptions correspondingly. Mark one size as default - it will be used by browsers that do not support responsive images.
Thus, srcset is a way to “set it and forget it.” More detailed information on how to make an image responsive can be found here.

Besides, you should mind that there exist different screen resolutions. Some technologies demand higher resolutions than others. Thus, for instance, retina displays of Mac’s patented technology used for iPhone, iPad, MacBook, and iMac are designed so that the human eye never ‘sees’ pixels on the picture. This is achieved due to using twice the “average” value of pixel density and the resolution of these displays is really high. So, it is recommended to think about how your website’s images will look when opened on mentioned devices as well as create and set up corresponding high resolutions for all retina displays that are popular. Google Analytics can help you with getting this data. The contemporary browser and website technologies allow determining display resolution on the go and adapting both direct visuals and design elements such as background canvas, buttons, etc. If you are not sure after you finished your setup, use browser testing tools like Responsinator or ScreenFly to check how your website looks on different screens and in their different positions.
Tip 3. Test Speed
Image optimization can also speed up your website. After you have published your images together with the content, check the total load speed for the page and follow the recommendations from the service(s) applied. For example, Google PageSpeed Insights service provides various metrics such as FCP (First Contentful Paint) that measures the time from when the webpage starts loading page images including regular and background images, <svg> elements, or non-white <canvas> elements. Correspondingly, the recommendations offered will give you a hint of how to optimize all of your images for SEO.
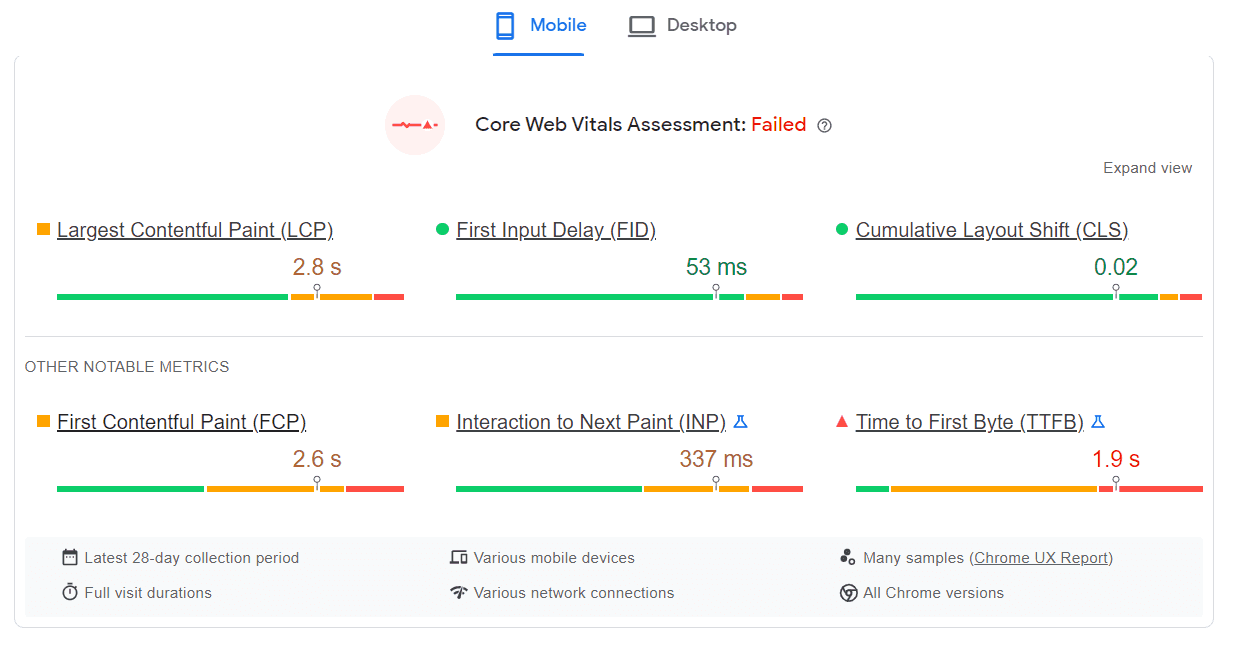
The following strategies can be applied for enhanced image-load speed on your website:
implement “LazyLoad” for your visuals - The first approach is to not load images until the user scrolls down to their placeholders as explained here. The second strategy is to load light-weight blurred versions as placeholders first everywhere to make the website look finished and nice as well as ready for reading. Then, when traffic allows, load big-size visuals of proper quality as per the display requirements of the device’s screen. One can use JavaScript for custom lazy-load scripts as we have discussed previously in our blog.
leverage browser caching as per recommendations from Google PageSpeed Insights. This approach allows for avoiding re-loading pictures again for a repeated visit of the user. This is achieved through local image storage by the user’s browser in its “cache.”
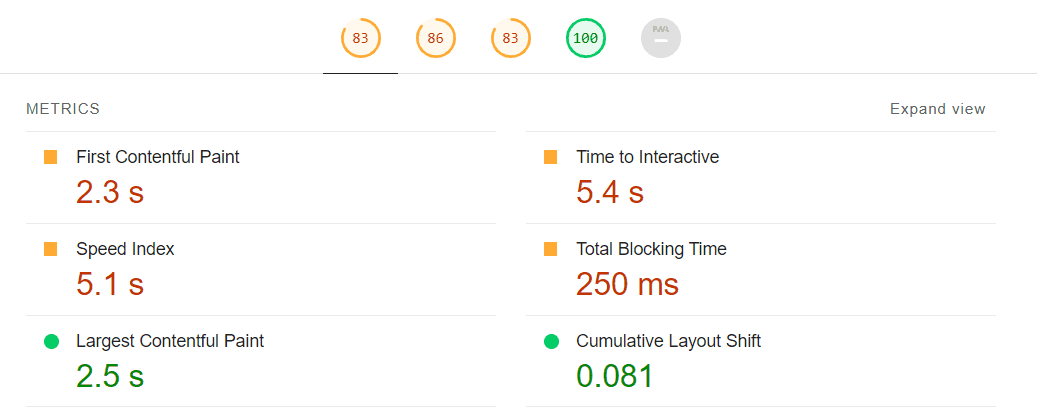
Having implemented the above recommendations, check the result of your actions via PageSpeed Insights and Lighthouse plugin.
Tip 4. Optimize Image File Name
One of the important recommendations for SEO specialists optimizing their images is to find a relevant name for each image file. Try to use a passing keyword but avoid spamming or generating irrelevant titles. File names should not use underscores and special characters.

Separate title words with “-” symbols, don’t use spaces in between. Do not generate file names that contain over five words. It is also recommended to create different titles for different language versions of your website if it supports multiple regions.

One more hint is to remember about the resulting file path. If you have a technical opportunity to group your images into relevant folders and name these folders with meaningful folder names, please do that. Do not store all image files in the same folder if you can separate your two product groups, such as drills and lawn mowers, for instance.
Tip 5. Use Alt and Title Tags
Image attributes SEO is another important area for optimization. Google images ranking factors include proper usage of an alt tag and a proper title tag, so each published image should have them. The principle of wording these tags is the same as for the image filename. Best alt attributes for images don’t contain spam, use natural language and describe what is in fact depicted. Do not exceed the length of 125 characters when preparing each of the tags.
Alt tag (alternative text for images) and title tag are often the same. Image alt attribute is mandatory as it is the source which Google takes information from when indexing the image. This data is then used for ranking in Google images. Whenever the image itself is broken, the alt tag will be displayed in the browser instead. In addition, the alt tag affects the overall webpage ranking as it affects its overall search relevance.

The image’s title tag is optional. However, mind that the title is displayed on hover when the user’s cursor is over the picture.
So, this information can be used for usability, too. Another option is to use this field as a call for action. You can increase your CPA by generating into title tag such text as “call now” or “buy with a discount by clicking here,” etc.
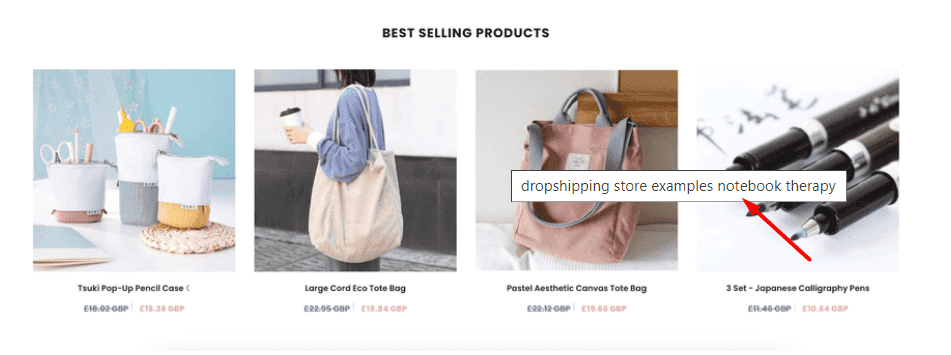
Example of the display title text
Tip 6. Include Caption
The image caption is the parameter that helps improve user experience on your website. According to Google, you should mind your website’s main topic and the webpage’s main search intent. If the relevant webpage is about how to start traveling, your image’s caption should be about how to begin traveling, too.
Good image captions allow for improving user engagement and decrease the bounce rate as they are attracted visually and their eyes are caught with the content that to a high degree corresponds to their initial search intent.
Tip 7. Use Unique Images
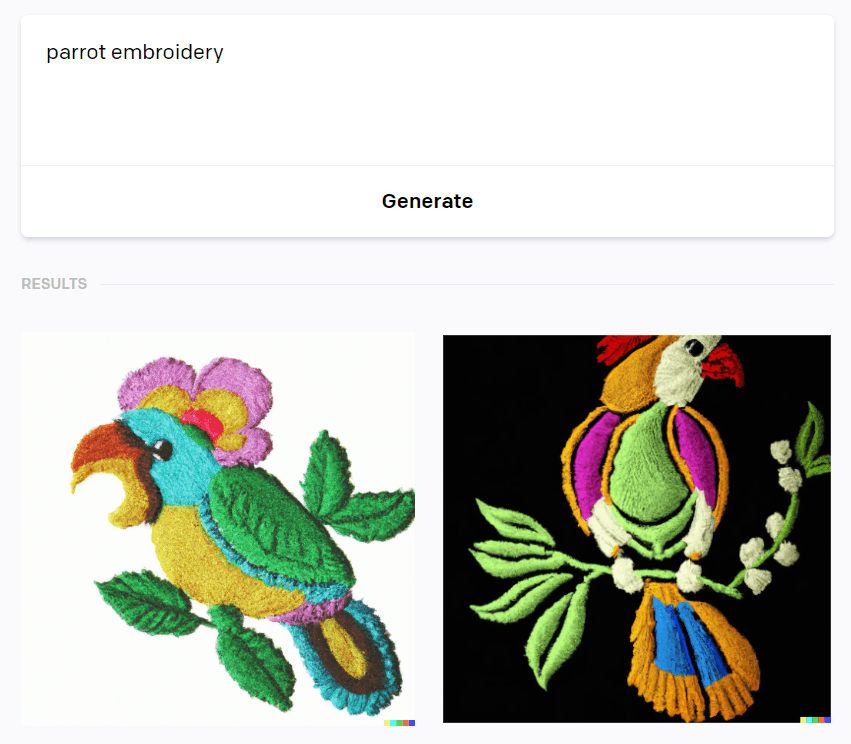
The same as text content should always be checked for plagiarism and any copy-pasted phrases or sentences should be removed or rephrased, image uniqueness is crucial, too. Unique content allows better SEO. To achieve high degree of uniqueness, you may use stock photos, especially paid ones, create reverse images, or you may use the new AI tools that allow generating unique pictures by request. A popular tool to apply today is DELL-I. How to write a request to OpenAI to generate a unique image with certain criteria we have recently discussed here.
The last but not the least recommendation is to remember about copyright. If you use copyrighted images, free or paid, do that legally. Mention the author, and add a trademark if required. If you will ever violate the Digital Millennium Copyright Act (DMCA), you will lose your ranking positions forever and will be filtered out by the search engine, with the penalty level difficult to overcome and hard to undo.
Tip 8. Structure Your Data
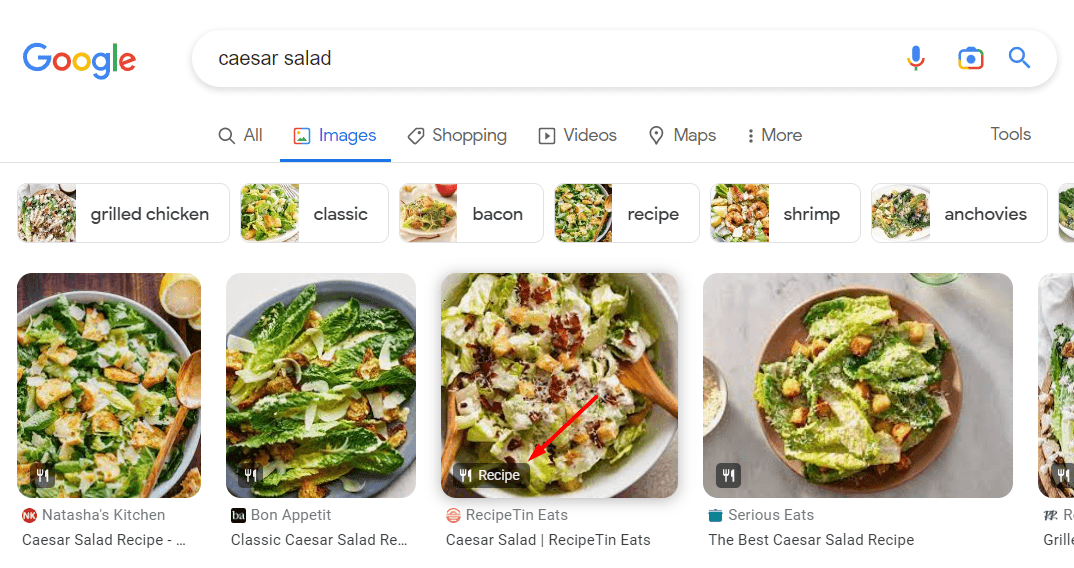
Image optimization in SEO includes data structuring. Images data can be structured the same way as other data. For instance, well-structured data is good for images of cooking receipts as well as product review videos. This is well-accessible for images. When applying structuring to images, your visual content will be displayed with so-called badges.
You can also use the image’s metadata to include copyright if needed. How to format your image license is described here.
Tip 9. Create an Image Sitemap
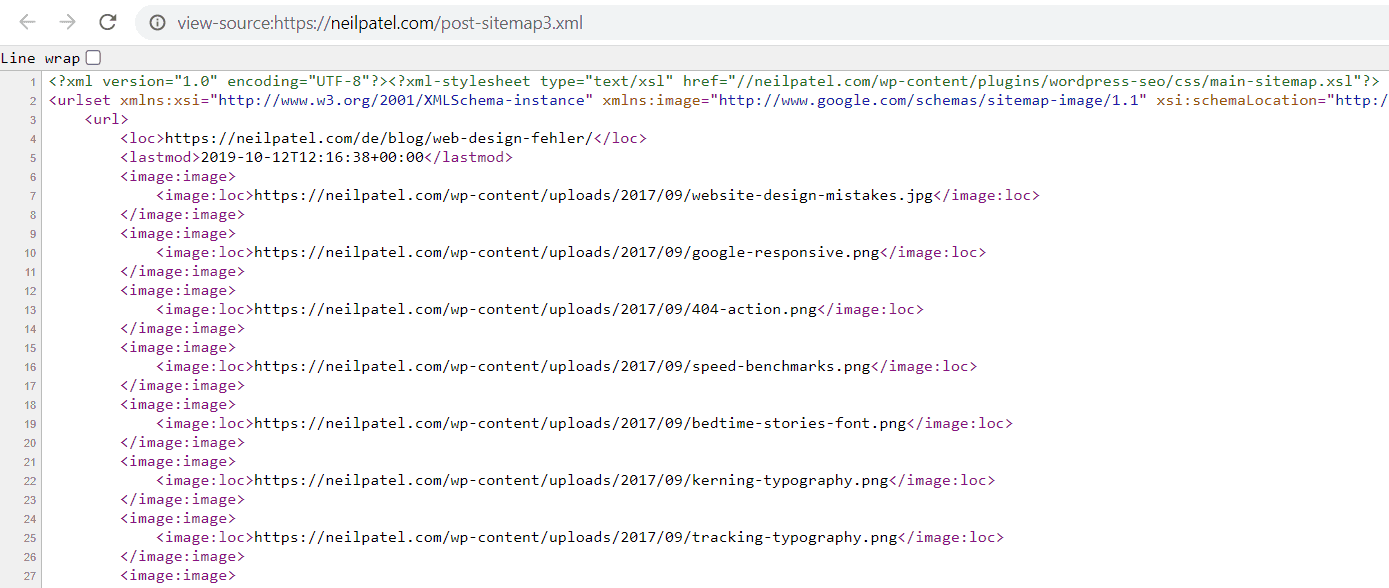
Search engine optimization for images involves technical support for proper indexation. Create an image sitemap to help Google crawl your visuals better.
When creating an image sitemap:
for each image entry: include the title, description, URL location, caption, and license information;
for video entries: include the title, description, URL location, thumbnail URL, and raw video file URL;
Apply dedicated plugins (such as Yoast SEO for WordPress) to keep your sitemaps always up to date.
The main difference between a traditional sitemap of a website and an image sitemap is that the latter may contain links to another domain. You may include up to 1,000 images for the same webpage. How to properly create and maintain an image sitemap is described here.
Tip 10. Optimize Images for Social Media Sharing
If your website supports social media sharing of the published content, it is highly recommended to optimize images for this function, correspondingly. Open Graph tool can be used to optimize visuals for Facebook and Pinterest, while Twitter offers its own tool for images’ optimization.

Here, image sizes are important as each social network has its own size and resolution requirements. Different sizes are applicable for different content types such as posts, ads, and profile headers. In addition, file formats are important, too. Lastly, mind image content such as collages, framed pictures, and geometrical patterns look especially impressive on social media accounts and attracts views and clicks.

We remind you that we have already discussed how to increase social media traffic. Optimized images will be helpful here for both SMM traffic and own website traffic as well.
Conclusion
In this article, we have discussed some image optimization techniques, principles of Google Image search optimization, image alt attribute, how to name images for SEO, data structures images, and much more. SEO for images is another type of art in this profession.
Having followed the 10 tips offered, don’t forget to audit your website for image optimization. Today, various SEO services provide endless opportunities to check image optimization and data correctness after you completed this work. For instance, Screaming Frog SEO is a free tool to spot missing alt attributes and alt text for images. This service also allows detecting too large image sizes. It also allows working with images and their parameters in bulks. The already mentioned Google’s PageSpeed Insight is a perfect tool to monitor the website’s speed load and ensure that visuals don’t spoil the metrics. Lastly, checking data structures can be best done by using this SEO tool.
Regular diagnostics of image optimization efficiency will allow for spotting broken images and image links, images with redirects, missing alt tags and titles, and solving other related problems easily and on time.
If you don’t want to limit yourself to improving your website’s images only, here are some tips on how to make your website better in other ways.


